As an agent in Halo, you'll spend most of your time interacting with tickets in Halo.
Halo offers robust access control, which is a fancy way of saying some tickets will not be visible to you. The Halo interface, and the basics covered here, apply to all ticket types - even if you don't have access to the specific ticket types shown in the screenshots (and don't worry - these are test tickets, so there's no sensitive data here!).
Details like status, forms, and other things will vary from ticket type to ticket type.
Types of Tickets
Tickets in Halo are sort of like "units of work." They can be anything from:
- Change requests ("We plan to upgrade this app on xx, is that cool?")
- Incident requests ("Help, stuff is broke!")
- Other things
These "ticket types" are grouped together with any you have access to appearing on the lefthand navigation bar.
Ticket Groups
Ticket Groups have been established in Halo to allow one ticket to be assigned to a group. Agents can assign tickets to any group that is visible to them, however, agents will only have access to tickets in groups of which they are a part. This means that an agent can assign a ticket to a group that they have no access to. Once that happens that agent will no longer see the ticket, and in some circumstances will get an error saying "Ticket not found, or you do not have access to this Ticket." The ticket is fine, it just is no longer viewable to that agent.
Navigating Tickets

After logging into Halo, you'll see all the ticket types you have access to listed in the left-hand navigation. Click on one of those icons to be taken to that ticket grouping.
The Agent Homescreen, the first screen you see when logging in, also features a dashboard that'll have links to specific ticket groups as well. You can click on one of those links to access tickets, if you so fancy.
Lists
This is a typical list of tickets in Halo. There's a lot going on, but there are really three main sections of the screen:

- Views - Each module has a default ticket view, which determines how the tickets are displayed. These views allow you to look at groupings of tickets easily. You can also filter your ticket view here (more below).
- The ticket list - Lists the tickets that you have permission to see in this view. What you see here is determined by the module you're in, the current view, and your permissions. You can sort and filter this list further (see below).
- Action Buttons - The Action buttons let you create a new ticket, change the list view format (see below), and more.
Setting your default list View
You can change the default grouping of tickets (just for you) by:
-
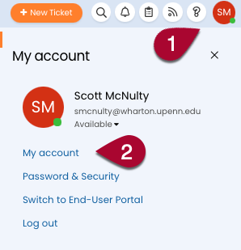
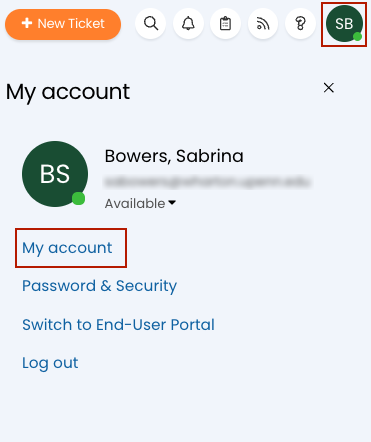
Click on your initials in the upper right of the Halo screen and then click on My account.

-
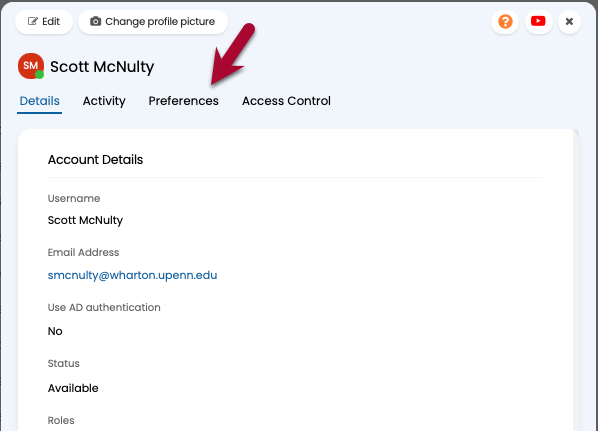
Click on Preferences.

-
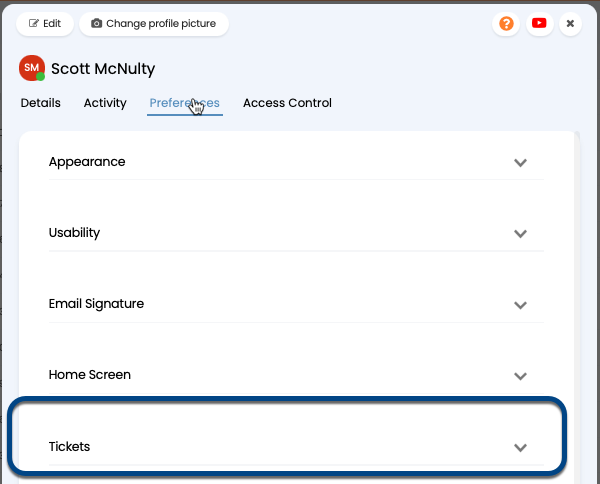
Click on Tickets to expand the Ticket preferences:

-
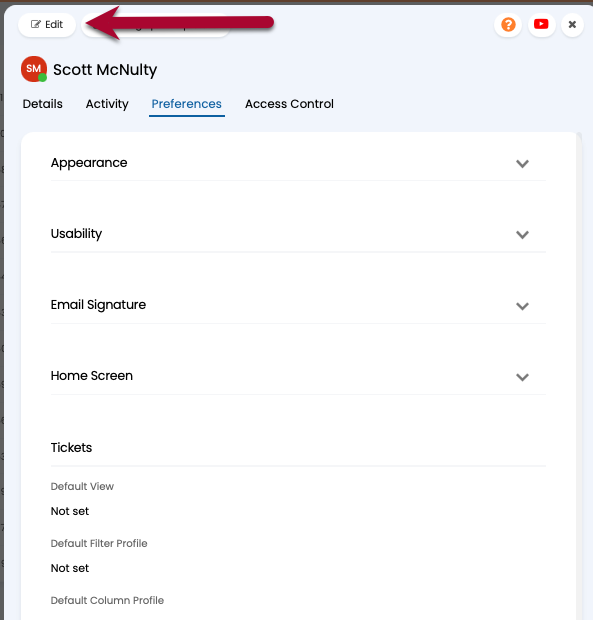
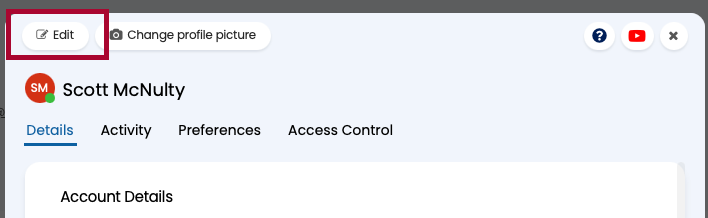
All of your current Ticket preferences are listed. Click on the Edit button to make some changes.

-
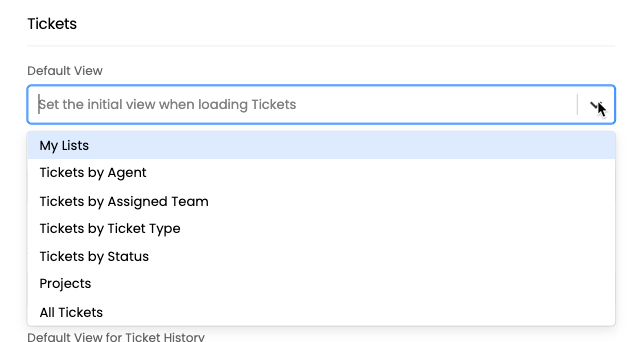
You can change a bunch of things here, but we're just interested in the Default View. Click on the dropdown and select the view you'd like to use as your default.

-
Click the Save button at the top of the Preferences window, and your default Ticket filter is now set.
Filters

When you're in a view, you might wonder where that closed ticket, or that ticket that's awaiting a response, is hiding.
Chances are, you can't find it because a filter is hiding it from you (helpfully).
The default filters are:
- All Tickets - Displays all tickets, no matter their current status.
- Closed Tickets - Only displays tickets with a "Closed" status.
- Open Tickets - Only displays tickets that are considered "Open," which includes "New," "Updated," and "Re-Opened."
- Open Tickets (Including SLA Hold) - Includes everything in Open Tickets plus "On Hold" and "Awaiting Response."
Changing the Ticket Filter

As you can see above, there are two ways to change the ticket filter:
- In the left side navigation bar, hover your pointer over the filter icon under the name of your current view.
- Click on the filter icon (you'll see a little pencil appear next to the name of the currently applied filter).
- All the current filters are listed. Click on the one you want.
The new filter name is displayed both under the view name and at the top left of the ticket list.
You can click on the filter name at the top left of the ticket list, and a dropdown menu will appear listing all the available filters. Switch filters by clicking on another one.
Setting your default filter
Wouldn't it be great to be able to set your default filter for all ticket lists? Here's how you do it:
-
Click on your initials in the upper right of the Halo screen and then click on My account.
-
Click on Preferences.
-
Click on Tickets to expand the Ticket preferences:
-
All of your current Ticket preferences are listed. Click on the Edit button to make some changes.
-
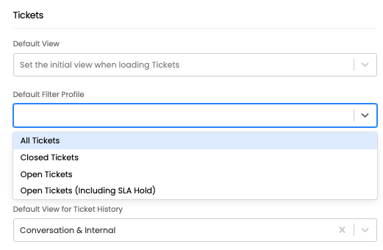
You can change a bunch of things here, but we're just interested in the Default Filter Profile. Click on the dropdown and select the filter you'd like to use as your default.

-
Click the Save button at the top of the Preferences window, and your default Ticket filter is now set.
Ticket List

Sorting and Filtering
By default, your tickets are listed in a list. Sort the list by clicking on any column header. Click the header again to reserve that sort.
Hovering over a column header will reveal a filter icon. Click on the
filter icon , and a filter box appears below each column header. You can either type in text or enter a date to filter. The ticket view will automatically update to show you the results as you type, which is nice.
The filter boxes will stick around until you close them by clicking the X icon all the way to the left of the filter boxes. You can always open them again by clicking the filter icon on any header.
Changing the View
By default, the ticket list is shown in "Table view," which lists each ticket meeting your filtering criteria as entries in a table. You can sort the table (see above) and click on a ticket to get more details.
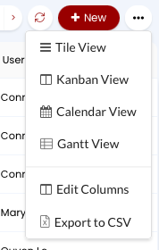
There are a few other views available to you, including:
- Tile View
- Kanban View
- Calendar View
- Gantt View
To change your current view:
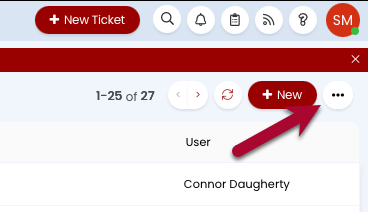
- Click the ... button in the top right corner of the ticket list.

-
Click on the view that you'd like to switch to (note the view you're currently using won't be in the list).

-
The ticket view changes.
Table View (default)

Table View is the default. Click on a column header to sort by that column. Hover over the column and click the Filter icon to filter.
You can export the ticket list as a CSV file if you like by clicking on the ... button and clicking Export to CSV. Just be aware that the exported file will only contain the data displayed in the table; full ticket information is not included.
Tile View

Tile view is inspired by Outlook. It lists all the tickets that conform to your filters in a column. Click on a ticket to see details on the same page. This is useful for browsing the contents of tickets quickly.
Kanban View

Kanban is a way of visualizing work using cards (which are tickets in Halo) into rows or columns (statuses or workflow states in Halo). One of the nice things about the Kanban view is that you can drag and drop a  ticket from one column to another when grouping by Status, updating the status as you go.
Clicking on the ... button shows that you can change the grouping (i.e., columns) option for this view using either Workflow Stage or Status.
Editing the Columns in Table View
The table view is the default ticket list view, and the one that you'll probably end up using most. If the default columns aren't displaying the information you want you can create your own custom view:
- Click on the … in the top right corner
- Click Edit Columns.
- Highlight the view you'd like to base your custom view on (“F&A Column View” is a good one) and click Edit.
- Change the Column Profile Name to something meaningful to you. This name will be what's listed in your available views.
- In the Columns section you'll see a list of the columns in the current view. Here you can:
- Change the order of the columns by dragging and dropping them.
- Remove a column by clicking on the trash can icon.
- Change the Sorting, Grouping, or display name of a column by clicking on the pencil icon.
- You can decide set a column to be the primary sort order all the way to the quinary sort order.
- Each table can only be grouped by one column.
- Add a column to the view by clicking Add and selecting a column, or columns, from the list.
- Scroll down and click Save as new.
To use your custom view:
- Click on the … in the top right corner
- Click Edit Columns.
- Highlight the view you just saved.
- Click Use.
Ticket Preferences
By default Halo displays tickets in the same way for everyone in a particular team. However, if you'd like to change the why tickets are displayed and filtered for yourself you can do that.
- Login to the Halo agent application.
- Click on your account icon in the top right of the screen.
- Click My account.
- Click on the Edit button.
- Select the Preferences tab.
- Click on the Tickets section.
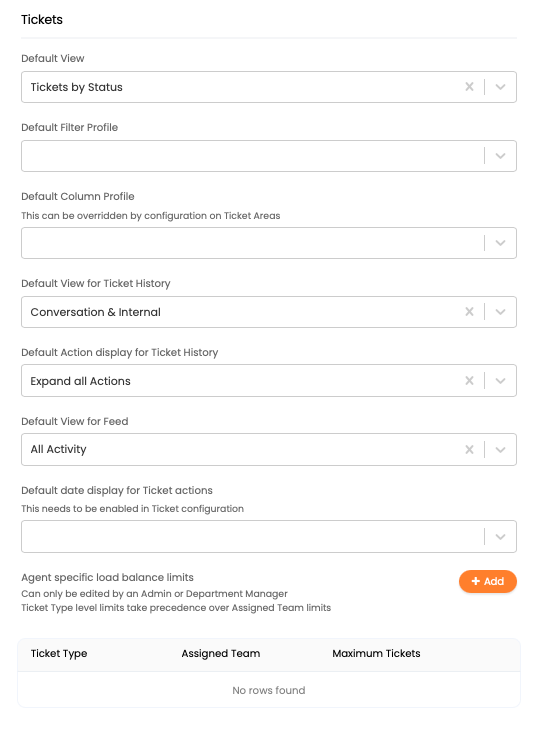
Here's what each ticket preference means and the options:- Default View: This sets your view of ticket lists. You can have them grouped by type, team, agent, and more. You can always change the view on the list as well.
- Default Filter Profile: The default filter on ticket lists. It can be All, Closed, Open Tickets, or Open Tickets (Including SLA Hold). This can always be changed on the list itself (see the Filters section above).
- Default Column Profile: You can set the columns included in ticket lists using a column profile. See "Editing Columns in Table View" above for more information.
- Default View for Ticket History: By default the ticket history displays conversations (email) and Internal (notes). You can set this to "All Actions" or "Conversation."
- Default Action display for Ticket History: By default all the actions in the Ticket History are expanded to give you the information at a glance. You can opt to have only the most recent action expanded.
- Default View for Feed: You can decide what items appear on your ticket feed.
- Default date display for Ticket actions: We aren't using this at the moment, but it can be set to either Date Done or Date Created.
- Once you've set your preferences click the Save button either at the very bottom of the window (you'll need to scroll) or at the top left.


