Asynchronous teaching leverages pre-recorded lectures published in a place where students enrolled in the course can easily access them to flip the classroom. Panopto, Wharton's recording tool, allows instructors to seamlessly capture, edit, and upload video to Canvas.
Before You Start
You will need the following before you can complete this task:
- A Panopto Recorder App (either installed on your device or accessed through a web browser) OR Zoom
- A Canvas site
- Class Recordings tab (in Canvas)
- Enable cookies on your device
Before You Record
Recording a lecture is a very different experience from delivering a lecture in the classroom. Even if you've given the same lecture dozens of times before, it behooves you to do some planning before you hit Record.
Decide how you would like to record. You can record in Panopto, Zoom, or tool of your choice. We recommend recording in the tool you are most comfortable using.
Suggestions and Recommendations
- Keep recordings 6-15 minutes in length to keep students engaged and allow for adequate breaks.
- Script ahead of time, or at least create an outline to best organize your thoughts.
- Consider different means of collaboration and participation, such as discussion posts.
- Initiate a test recording to become comfortable with the application's features. Place the test recording in your personal folder so students don't have access to it.
- Plan how you will handle any mistakes you make during the recording. You can:
- Acknowledge the mistake and move on, as you would in class
- Edit out the error prior to making it available to students
- Discard the recording and start all over again
- If you are recording a video which you would like made available to multiple Canvas sites, please reach out to courseware@wharton.upenn.edu.
Recording in Panopto
Accessing the Panopto Recorder
- Go to the Class Recordings folder for your Canvas site and click Create.
- Select one of the Panopto recording options, either the Panopto Recording app (installation required) or the Panopto Capture web browser tool.

Panopto should recognize your Operating System.

Starting a Panopto Recording
- Log into the Canvas site where you'd like this video to live.
- Click Class Recordings on the Courses menu:

- Click the blue Create button in the upper right corner.
- Click Panopto Capture to record in a web browser:
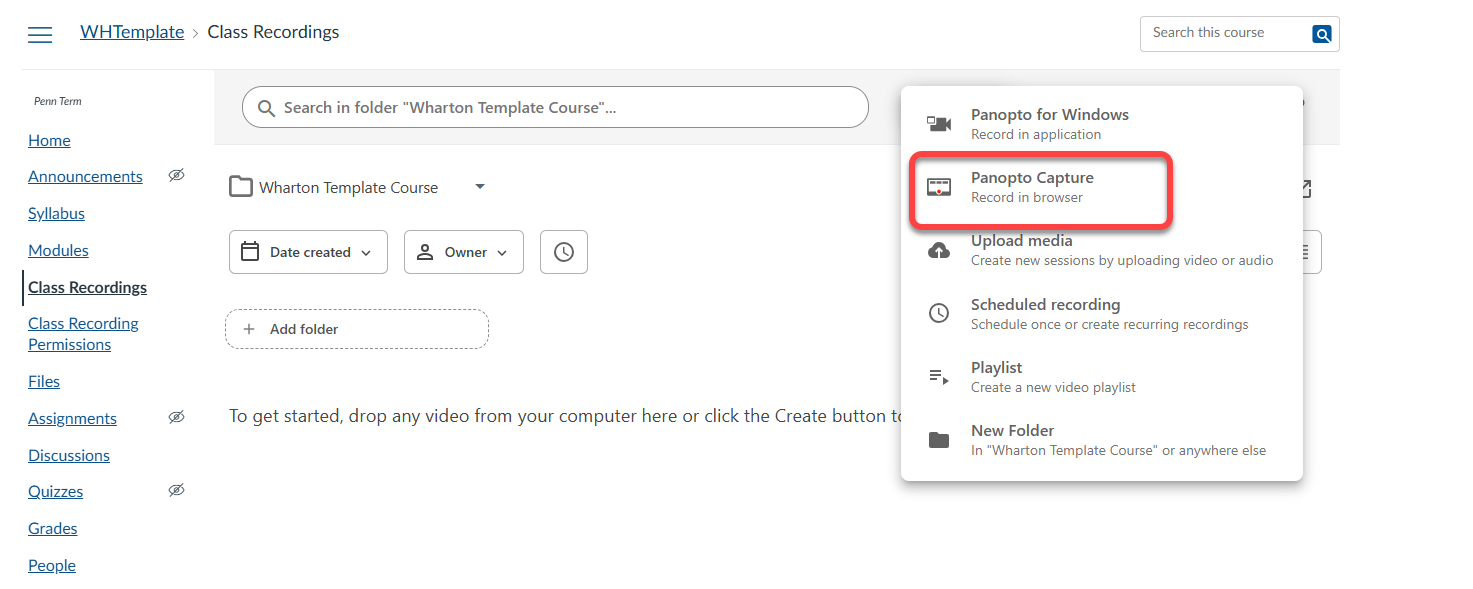


The Panopto Capture web browser app will launch in a new tab.

- Control for Audio. This option will allow you to choose which microphone Panopto should use.
- Control for Video. This will allow you to turn on your camera and blur or choose to add a background (see note in item #4)
- Control for Screen Sharing. This will allow you to choose a Tab, Window, or entire screen.
- Control for settings. This will allow you to configure streams, video layout, and add a background. There are limited backgrounds already available, or you can upload your own background image.
- Control to start and stop recording. The default setting is for Panopto to display a 5 second countdown before the recording starts.
When you see Upload complete, you can close the Panopto Capture Web Browser tool, or select Record New if you would like to record additional videos.

Panopto shows Upload Complete for a very short time before it moves to the next steps in processing your recording. This occurs before the bar is completely filled and no additional actions are needed.
If you see any of the following messages, it is safe to close your browser window:
- Upload complete
- Getting your video ready for editing
- Your video is ready
- Putting on the finishing touches
Panopto uploads your video to the Class Recordings tab of your Canvas site, then finish processing the video. While the video is processing, it will appear with a white thumbnail image in your Class Recordings tab. After it has finished processing, the thumbnail will shift to the first image of the recording.

Uploading a Recording to Panopto
If you record videos in Zoom (outside of Canvas) or another recording tool of your choice, they can be uploaded to Panopto following the instructions in our Upload Video Conference Recordings article.
Recording Best Practices
- Use a reliable headset with a microphone. It will improve the audio capture, which is a critical component of recording capture.
- Close any applications you don’t want to share with your class.
- Verify your background conditions using your camera:
- Avoid bright background lights
- Check that the image isn't too dark to see you.
- Remove distracting items from the background.
- Open all applications you want captured before you begin the recording to avoid having to pause the recording to find them.
- Name recordings uniquely and be as consistent with the naming convention as possible. Consider: Course - Section - Class or Week # - Lesson Title - Video #. The video number should reflect which video it is in the lesson series.
- Example: MKTG 1010 - Section 001 - Virtual Class 1 - Developing Your Marketing Strategy - Video 1
Managing Your Recordings
Recording Availability
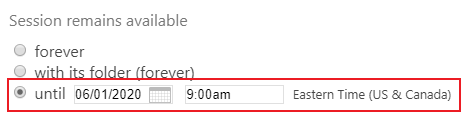
After a recording has been uploaded to Canvas, you'll be able to adjust the beginning and end dates of its visibility to students.
Important: The availability settings for newly recorded or uploaded videos will depend upon the settings configured in the Class Recording Permissions app.
- Hover over the newly uploaded recording.
- Click the Settings button.

- On the Overview tab, scroll to the Availability section at the bottom.
- Adjust the availability start date by selecting the radio button of the option with the customizable date field and update the date and time fields accordingly.

- Adjust the availability end date by selecting the radio button of the option with the customizable date field and update the date.


Copying a Recording
- Click Manage > Copy
- While the copy is processing, go to its Overview and edit the Folder name, choosing or typing the name of the desired target Canvas course site.
- Click Save, which moves the newly created copy to that other course's Class Recordings.
- You may need to first click Class Recordings again in that target Canvas course to see the moved video.
- For semester-long viewing dates, choose With its folder for start and end.
Editing a Recording
You can edit videos in Panopto. More details about how to do this can be found in our Editing Videos in Panopto article.
Questions?
- For assistance with downloading the app, contact your academic support representative
- Request help with using the Panopto Recorder app by emailing class-tech@wharton.upenn.edu