aPlus+ is an attendance-tracking tool that is integrated with Canvas through a third-party application. It simplifies attendance processes for teaching teams and helps ensure that students receive due credit for attending class. Students also benefit from an easily viewable attendance record right from Canvas.
- Access to Canvas
- Student enrollment in a course that is using aPlus+
Accessing aPlus+
Click on the aPlus+ Attendance tab from your course's navigation sidebar.

Authorizing aPlus+ Attendance for First-Time Use
Before you can access aPlus+, you must authorize it.
To authorize aPlus+ Attendance:
- Log into Canvas and go to the course you're interested in authorizing aPlus+ Attendance.
- Click on aPlus+ Attendance in the course navigation sidebar.
- The first time you access the tool, you will be prompted to authorize access to your account:
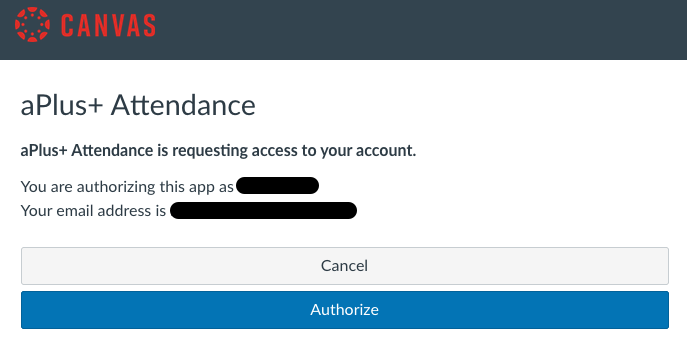
- Click the blue Authorize button.
- aPlus+ Attendance will load.

The aPlus+ Attendance Tab
You can access aPlus+ Attendance using your computer, tablet, or mobile device.
We recommend downloading the Canvas Student app for a smooth check-in process, especially if your class is using the QR code option for check-in.
To access aPlus+ via the Canvas Student app:


You will not be able to check in until your professor initiates the check-in session. When the check-in session appears as blue, you will be able to click through to the check-in screen.
Check-in Screen
If your professor is using a rolling QR/alphanumeric code, you will see something similar to the screenshot below projected at the front of your classroom. The image contains both the manual entry code and a scannable QR code:

To check-in to class during the check-in period:

Viewing Your Attendance Record
You can always view your up-to-date attendance record from the aPlus+ Attendance tab. Your check-ins and absence requests will display within seconds of being submitted.


Absence Requests
As a student, you now have the ability to request absences for days that you are unable to attend class. If you don't see this option, it's possible the absence request functionality hasn't been configured in your course.
Penn undergraduate students, including Wharton undergraduates, may report absences using the University's Course Action Notices (CAN) system. Please be aware that graduate students cannot use CAN to report absences, and that CAN is not an absence request tool.
Time Factors for aPlus+ Attendance Absence Requests
Students can request an absence using aPlus+ Attendance two weeks before a particular session and up until the end of the term.


Questions?
Troubleshooting tip: If you are using Safari and encounter access issues, please see our Using web browsers with Learning Tools article. If you have trouble in Chrome, try using a different browser, like Firefox.
If you need more assistance, please contact your Wharton Computing Support Team for support.