As part of an effort to standardize printer naming and usage, Wharton is transitioning to using an app called "PaperCut Print Deploy" for all networked printers.
Before You Start
- These instructions are for Wharton-managed computers. If you're trying to print from a personal machine, please reach out to support@wharton.upenn.edu.
- Printing using PaperCut Print Deploy requires your PennKey username and password. Be sure to have that handy.
- The computer you're printing from must either be using a wired on-campus network connection or be on the VPN to print.
All of our network printers now have new names. This list maps the old names to the new, so you can be sure you're installing the right printer. Each printer has a physical label on it, too, so you can confirm printer names by visiting the printer and looking at its label.
Installing Printers
The instructions for installing printers using Print Deploy are slightly different depending on which operating system you're using. No matter what operating system you use, though, these instructions require:
- You're using a Wharton-managed computer.
- That computer is either using a hardwired on-campus network connection or you're connected to the VPN (off-campus or on AirPennNet).
This list of department printers is searchable by department, printer name (both old and new), and functionality.
Windows Instructions
To install printers on your Wharton-managed Windows device:
- Click on the green printer icon in your System Tray located next to the time in the bottom right corner of your screen. You may need to expand it.

⚠ If you don't see the green Print Deploy icon in your system tray, contact support@wharton.upenn.edu. - Select View my printers from the menu.

- Sign in using your PennKey username and password.
- You will see your My printers tab, detailing any printers you’ve already installed (if any).

- On the left sidebar, click Add printers to see the list of available printers.

- Use the search field to quickly find a printer. This list maps the old printer names to the new so you can be sure you're adding the correct printer. Each printer has a physical name label as well.

- Once you have identified the correct printer (the name will match the label on the physical printer), click Install to add the printer to your computer. You'll receive a confirmation when it has been added successfully.


Installed printers will be visible in Settings > Bluetooth & devices > Printers & Scanners, as well as in the PaperCut Print Deploy application under the My printers section
🖨 Note: Once you've added the new network printers to your computer, you should remove the old ones. Follow the instructions in the next section to take care of that.
MacOS Instructions
To install printers on your Wharton-managed macOS device, you'll first need to install Print Deploy from the Self Service app and then add printers:
- Open your Applications folder in the Finder app and open the Self Service app.
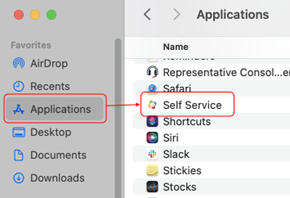
- Locate the offering titled Papercut Print Deploy and click install.
- Log in using your PennKey username and password.
- Once Print Deploy is installed on your Wharton-managed Mac, click the green printer icon that appears in your menu bar.

- Select View my printers from the menu.

- Sign in using your PennKey username and password.
- You will see your My printers tab, detailing any printers you’ve already installed (if any).

- On the left sidebar, click Add printers to see the list of available printers.

- Use the search field to quickly find a printer. This list maps the old printer names to the new so you can be sure you're adding the correct printer. Each printer has a physical name label as well.
- Once you have identified the correct printer (the name will match the label on the physical printer), click Install to add the printer to your computer. You'll receive a confirmation when it has been added successfully.


Installed printers will be visible in System Settings > Printers & Scanners, as well as in the PaperCut Print Deploy application under the My printers section.
🖨 Note: Once you've added the new network printers to your computer, you should remove the old ones. Follow the instructions in the next section to take care of that.
Removing Printers
Once you've added all the printers you'll need, you'll want to remove the old (or "Legacy") printers you have installed on your Wharton-managed computer. Wharton Computing has created a simple way to remove all of the old printers at once, while leaving any printers connected using the new method alone.
Windows Network Printer Uninstaller Instructions
To remove the old printers on a Wharton-managed Windows computer:
- Locate the BigFix icon in your system tray. (The system tray is at the bottom right corner, next to the time. You may need to click on the up/down arrow to expand it.)
- Double-click the BigFix Icon to open the app.
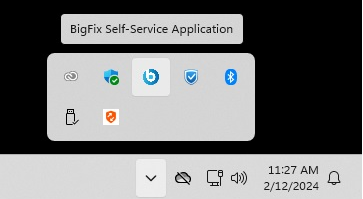
- Locate the offering titled Wharton Network Printer Uninstaller.
- Click Install - note that only network printers installed from the previous Wharton print server will be removed.
MacOS Network Printer Uninstaller Instructions
To remove the old printers on a Wharton-managed Mac computer:
- Open your Applications folder in the Finder app and open the Self Service app.
- Locate the offering titled Wharton Network Printer Uninstaller.
- Click Install - note that only network printers installed from the previous Wharton print server will be removed.
Removing Printers Manually
If the Wharton Network Printer Uninstaller missed an old printer, or you want to remove just one, you can delete it yourself in your computer's settings. Remove only the old printers. The ones you added with Print Deploy are the ones you want to keep.
Before you start, check the departmental printers list to confirm which printer names are the old ones.
Windows Manual Printer Removal Instructions
- Open Settings > Bluetooth & devices > Printers & scanners.
- Select the old printer you want to remove.
- Click Remove.

- Click Yes to confirm.
- Repeat for each old printer.

MacOS Manual Printer Removal Instructions
- Open System Settings > Printers & Scanners.
- Click on the old printer you want to remove.
- Click Remove Printer on the bottom left.

- Click Remove Printer to confirm.
- Repeat for each old printer.

Questions or Issues?
Contact your Wharton Computing Representative.