aPlus+ Attendance is a Canvas-integrated attendance-tracking tool that enables teaching teams to manage student check-ins and track attendance. From an instructor standpoint, the check-ins can be administered manually using custom statuses, or you can allow students to sign in using a specific alphanumeric or QR code within a specified timeframe.
This article includes a basic aPlus+ Attendance overview, plus configuration and usage instructions. For details on using aPlus+ in your class sessions, see our Using aPlus+ in the Classroom (Instructors) article.
Before You Start
You will need:
- Access to Canvas
- Instructor role in the Wharton course that will use aPlus+ Attendance
For help with either of these, contact your Wharton Computing representative.
aPlus+ Attendance Overview
aPlus+ Attendance provides the following benefits:
- Rolling Code Check-in: Makes it extremely difficult to check in from outside the classroom by allowing you to project a code from your Canvas site during class.
- Direct Attendance Management: Allows you to manage the attendance schedule (called a timetable), update records, and access reporting tools from your course's aPlus+ Attendance tab.
- Easier Reporting: Enables you to analyze attendance data from one tab and access via multiple views (e.g. number of absences per student, type of absences, and many more options).
- Integration with Canvas Gradebook: Include an aggregated attendance score automatically in your gradebook based on your attendance policies.
- No More Absence Notifications: Provides a single place for students and faculty to review their attendance records. Instead of reviewing an email, you can review the record itself and make changes, such as updates to absence requests.
Configuring aPlus+ Attendance for your Course
Configuring aPlus+ Attendance can be done by any teaching team member with the role of Teacher or TA by following these 3 steps:
Unhide the aPlus+ Attendance tab
- Log into Canvas and select the course that will be using the aPlus+ Attendance tab.
- Select the Settings tab from your course sidebar navigation.
- Click on the Navigation tab.
- Drag aPlus+ Attendance from the hidden section to your course navigation.
- Drop aPlus+ Attendance in the tab order. The other visible tabs will move out of the way as you place it.
- Scroll down and click the blue Save button.
- aPlus+ should be on your course navigation sidebar where you placed it. To hide it/move it just repeat the above steps.
Authorize Account (First-Time Use Only)
As the instructor, you must click on the aPlus+ Attendance tab before students first try to access aPlus+. If students attempt to access it before you take this step to initiate the application, they will receive an error message. Clicking on the tab just once before a new semester will enable student access.
To authorize aPlus+ Attendance:
- Log into Canvas and go to the course you're interested in authorizing aPlus+ Attendance.
- Click on aPlus+ Attendance in the course navigation sidebar.
- The first time you access the tool, you will be prompted to authorize access to your account:
- Click the blue Authorize button.
- aPlus+ Attendance will load the Attendance Setup landing page (see the next section).
Set Up Attendance
After you click the Authorize button, or when you click the aPlus+ tab after authorizing the first time, you arrive at the Attendance Setup landing page. To set up attendance for this class:
- Check the Import attendance sessions from your information systems box and then choose a session weighting. The recommended weighting is "Equal sessions (1 point)," this section of the article explains weighting.
- Click the blue Apply button to save your changes.
You will now see the sessions populate on the course timetable, as shown in the screenshot below. This import should add all of your class meetings to your session timetables. The next section discusses some additional import options that you can use to add more/different entries to your timetable associated with other aspects of your course.
Make sure that the Sessions tab is selected and you have chosen a section (e.g. 1:45pmMGMT1110-001-Fall2024) to see the sessions populate on the timetable.
Additional Import Options
Typically, the attendance sessions will be imported from our information systems as detailed above; however, it is possible to import from course-calendar events, assignments, or even quizzes. This section details those options and why you might want to use them.
The additional import options are:
Course Calendar Events
If you want events on your calendar for this course to show on the aPlus+ timetable, check the Import Canvas calendar events box on the aPlus+ Attendance setup screen.
Canvas sites are typically configured using assignments rather than populating calendar events, so this may not be necessary for your course.
Canvas Course Assignment Due Dates as Events
Check Import Canvas course assignment due dates as events on the aPlus+ setup screen to populate your course assignments as attendance sessions on an aPlus+ timetable. Any assignment that you add to the Canvas course (outside of aPlus+) will sync with the aPlus+ timetable as long as a due date is set.
Once you check that box, an additional setting to count the submissions toward attendance for that day appears (Import Canvas assignment submissions as attendance).
With Import Canvas assignment submissions as attendance checked, students will be automatically marked as attended for that session when they submit the assignment.
Once a student successfully submits, their status will show as a green "Submission" (if they submitted on time):
Canvas Course Quiz Due Dates as Events
You can also set quizzes (as long as they have due dates) to sync on the aPlus+ timetable. To take this a step further, if you want to create a quiz that only in-person attendees will know about for that day, you can check the box to Import Canvas quiz submissions as attendance, which will then mark them with the "Submission" status in aPlus+:
Imported Session Weighting
Typically, each attendance session will be equally weighted for the purposes of grading (see Record Attendance as Assignment Grades), but you can change this on the aPlus+ setup screen via the Imported session weighting dropdown:
- Hours duration (fractional): Sessions are weighted relative to their duration with no rounding.
- Hours duration (rounded up): Sessions are weighted relative to their duration but are rounded up to the next hour. For example, a 95-minute session would have a weighting of 2.
- Equal sessions (1 point): Every session is treated equally regardless of session duration. This is the recommended setting.
Merge Multiple Section Calendars into One
Most faculty will decide to have attendance timetables specific to each course section, but merging multiple section calendars into one calendar is possible.
This setting should be used carefully, since it is impossible to undo without some manual clean-up of attendance.
Record Attendance as Assignment Grades
Anything that is counted towards attendance on an aPlus+ timetable -- whether a calendar event, quiz, assignment, or just a basic session that's either imported or manually added -- can be synced with the Canvas gradebook. However, please note that this can only exist as one assignment in Canvas.
Click the box next to Record attendance as assignment grades on the aPlus+ setup screen and some more settings will appear:
This one assignment will calculate as an aggregate attendance score based on the specific calculations you configure via the Calculations dropdown menu:
- Record attendance proportionally - The proportion of sessions attended vs. sessions taught (to date), is applied against a point value for the attendance assignment.
- Example: If a student attends 8 out of 10 sessions and the total attendance points available is 100, the student would earn 80 points (8/10 x 100).
- Penalty Rules - percentage impact on final grade (not compatible with weighted assignments in gradebook) - The instructor defines a set of attendance rules and once these are breached, this triggers a percentage penalty against the student's total grade. The attendance column sent to the gradebook is set to zero, so attendance does not affect students unless they breach an attendance rule.
- Example: If a student misses more than 3 classes, a 5% penalty is applied to their total grade. If the student's total grade was 90%, it would be reduced to 85%.
- Penalty Rules - points impact on weighted attendance (compatible with weighted assignments in gradebook) - The instructor defines a set of attendance rules and once these are breached, this triggers a point penalty against the student. The attendance column sent to the gradebook can be set to any point value, including 0. This gives the instructor the flexibility of giving positive points to a student based on attendance, as well as the option of only applying negative attendance points to the grades when a penalty is involved.
- Example: If a student is late more than 5 times, a penalty of 10 points is applied. If the student's total attendance points were 85, it would be reduced to 75.
- Record attendance as raw points - The instructor can enter the number of sessions and define the point value of attendance overall so that each session attended makes up a proportion of that attendance. The attendance is shown as a proportion of sessions attended vs. all sessions (not just the ones that have passed).
- Example: If there are 20 total sessions and attendance is worth 100 points, each session is worth 5 points (100/20). If a student attends 15 sessions, they would earn 75 points (15 x 5).
Select Additional Instructor Users
You can grant aPlus+ access to other Canvas users on the aPlus+ setup screen. You can only grant access to Canvas users that have the Teaching Assistant role (or roles based on it) in your course.
To grant access:
- Log into your Canvas course.
- Click aPlus Attendance on the course navigation.
- Check the box next to Select additional instructor users.
- Canvas users with the proper permissions in your course will be listed. Check the box next to all that you want to add.
- Click Apply.
Navigating aPlus+ Attendance
Once the Attendance Setup step is complete, you will be brought back to the main aPlus+ timetable. You can toggle among the different course timetables via a dropdown menu.
For example, if a course has multiple sections, there will likely be a different timetable for each section, as shown below:
Students Tab
The Students tab is the most common choice for viewing and managing recent attendance. You have the option to show an attendance-taking timeframe of up to 12 months, and you'll notice that this drills down to the specific session days and the status of each student for that session.
Statuses
"Status" refers to a student's different states of attendance (e.g. Attended, Absent, etc). There are a number of preset statuses within aPlus+ that can be applied to attendance sessions. In order to manually change a status, you will need to click on that day's session, which will then take you to a high-level view of that particular section timetable's student attendance statuses:
You, as the instructor, can select the status dropdown to make changes, supply comments specific to each student or as a general session comment seen by all, and also apply one status to all students by selecting the dropdown shown in the top left of the screenshot shown below:
After you make any changes here, remember to click the blue Save button.
To return to the Students tab after making any manual changes, select the blue timetable link in the upper left corner (in the screenshot above, this is Section 006).
Sessions
Session view allows you to manage your timetable information:
Some options that exist for each session include:
- Enter Attendance: Click directly on the session to return to the same manual attendance entry screen depicted in the "Statuses" section of this article (above):
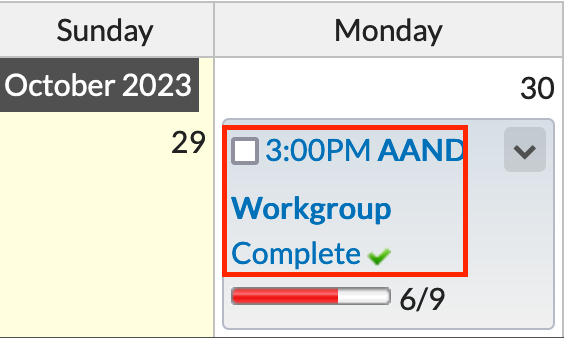
- Edit Session: Click on the dropdown arrow directly next to the timetable session in order to make any changes to the session date/time, location, duration, label (session name), and attendance weighting:
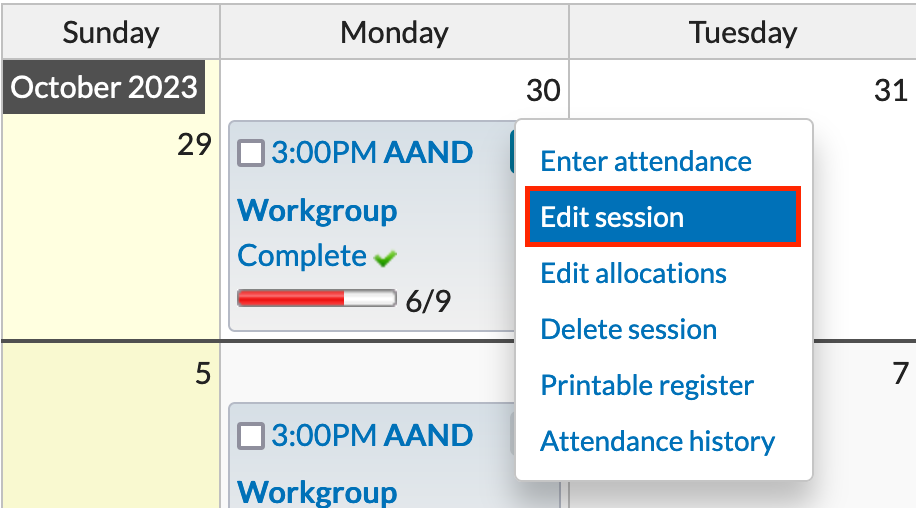
For details about additional options, please view the aPlus+ Canvas instructor guide's Session View article linked here.
Adding sessions
Although your sessions will typically already be populated and ready to go before a semester starts, you do have the ability to manually add any ad hoc sessions after the fact by selecting the Add sessions link shown below:
The timetable wizard allows you to create a single session or repeating sessions.
- Date: The date of the session or start date of a repeating pattern. This will default to the course start date.
- Time: The start time of the session. This is important if you are using code-based check-in.
- Repeat: The repeating session pattern (if applicable). You may need to come back into the wizard for more complex repeating schedules.
- Location: This can be left as default in most cases but is editable.
- Label: Optional name for the session(s) being created.
- Attendance Weighting: Can be left as default unless you are setting up sessions that are weighted uniquely by session.
Click Validate to continue, and the system will show how many sessions will be created. After validation, click Create Sessions, and your sessions will be created.
Reports
By selecting the 'Reports' link in the top menu of the aPlus+ tab, you can immediately see attendance reports for your course.
Reports can be exported to .csv or Excel by clicking the icon highlighted in red at the top right of the data table:
Codes
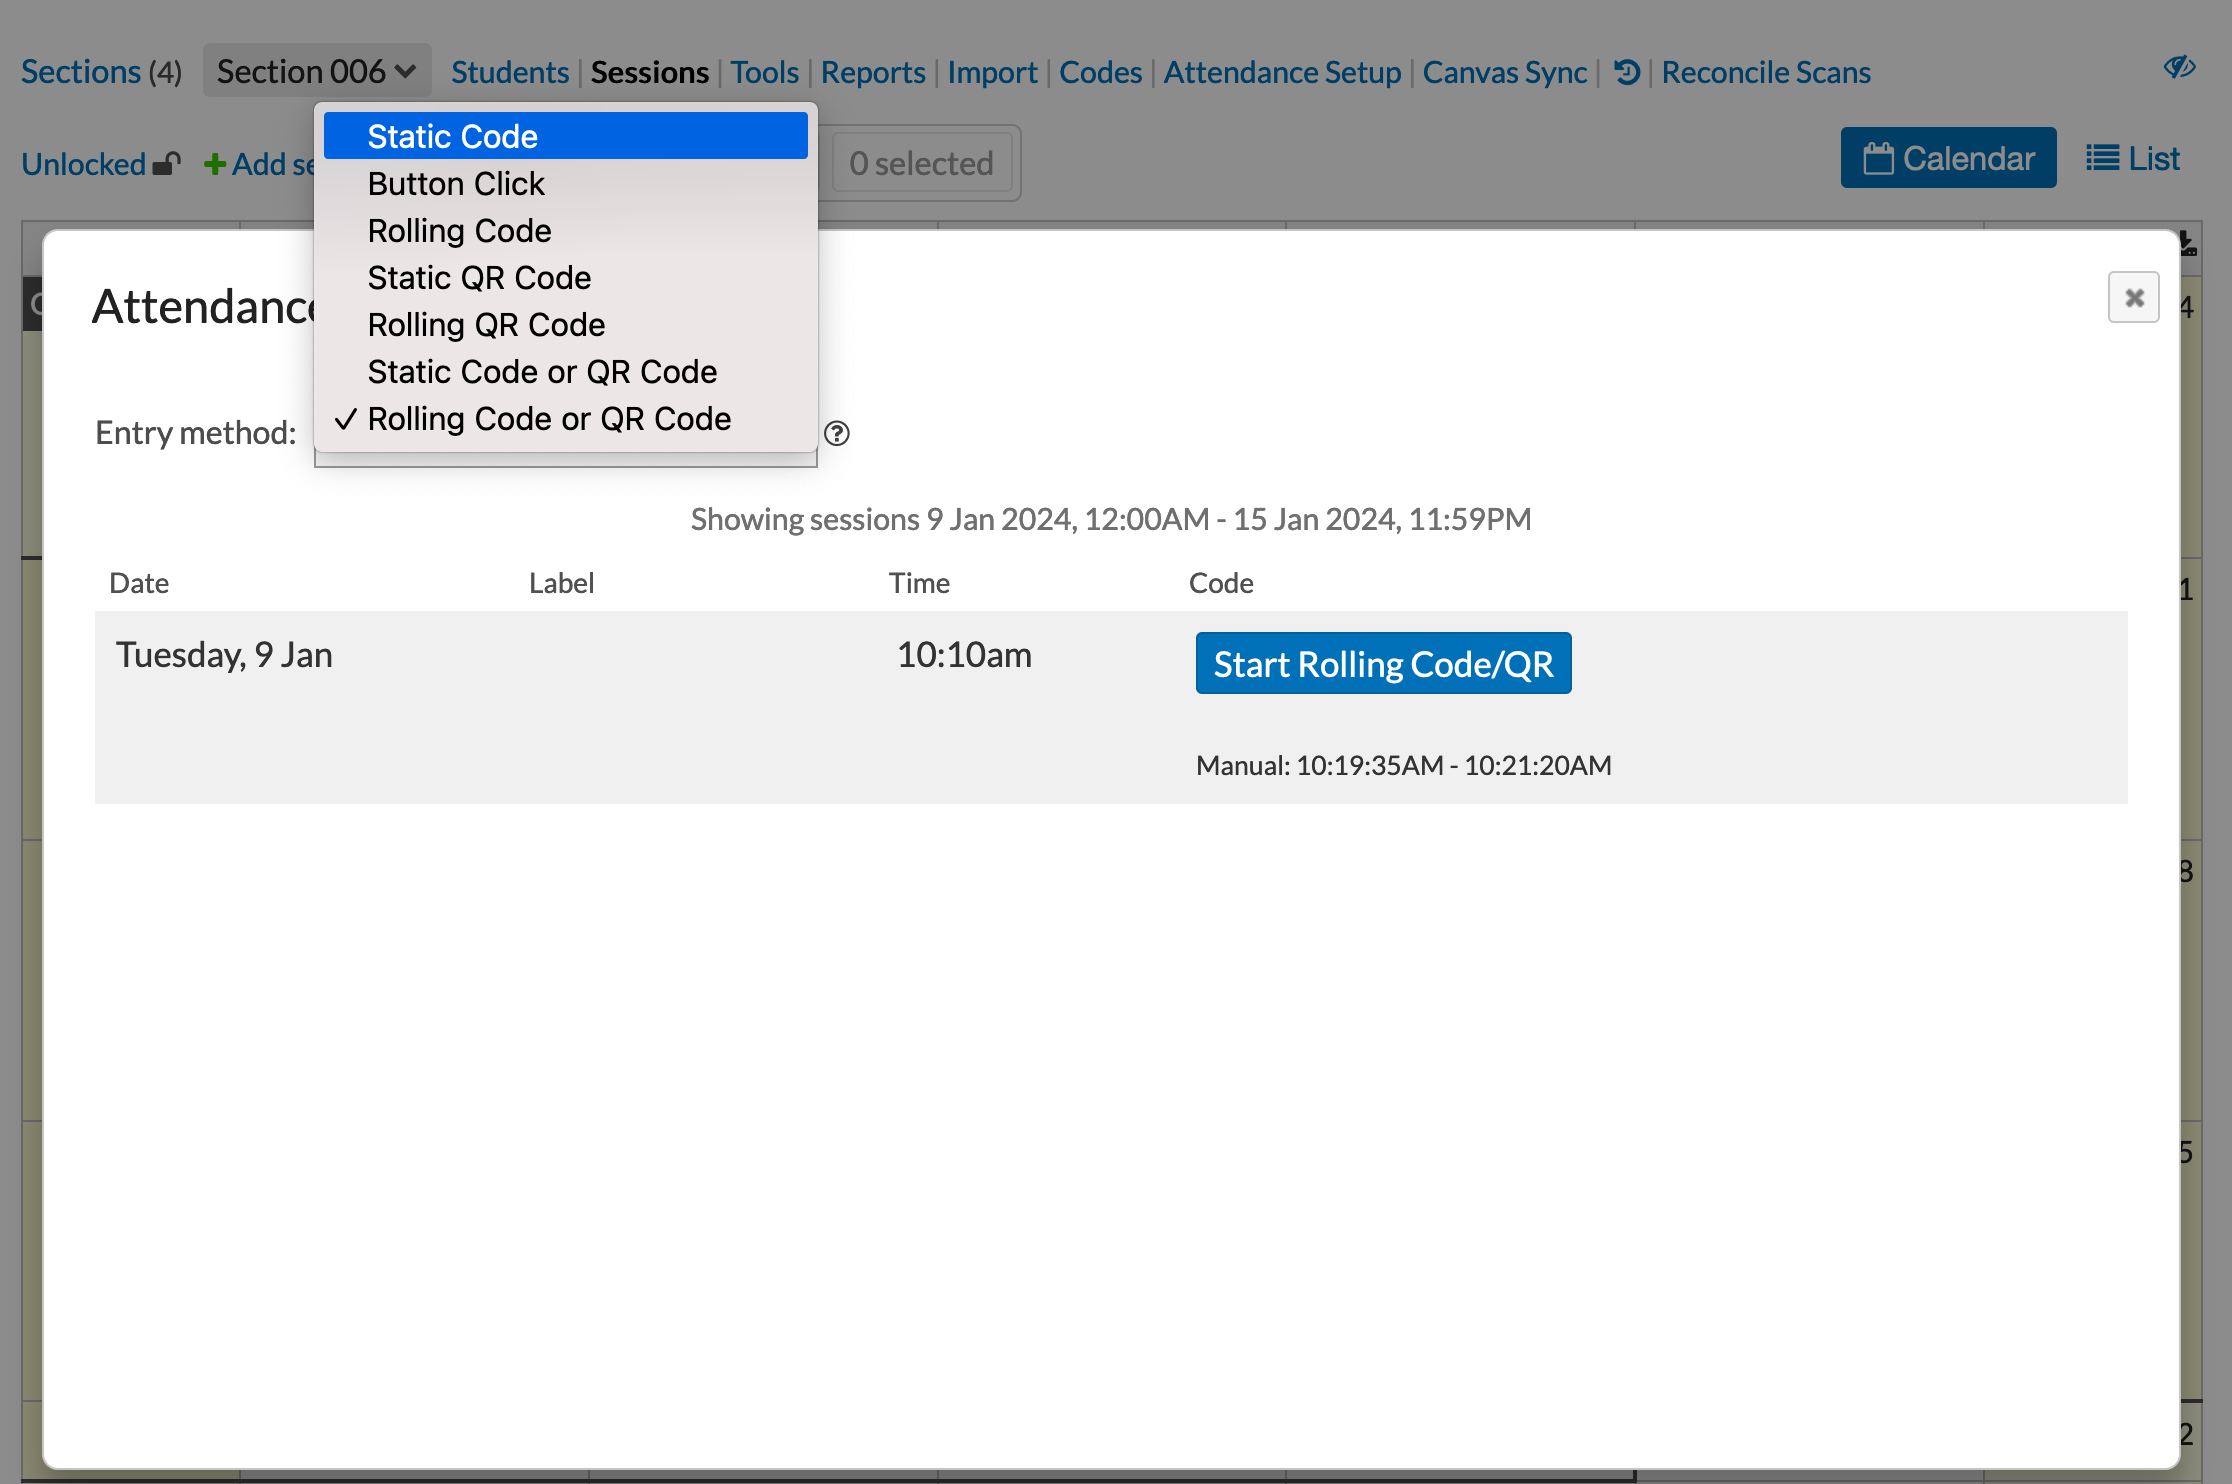
Once your sessions are configured and populated on the timetable(s) for any upcoming sessions, you can project either a QR or alphanumerical code that students must scan or enter in the aPlus+ attendance app to check in for class that day.
The available code options (and Button Click, which does not require the instructor to project anything, so is easily gameable by students) are shown below:
- Button Click: Students select a submit button within an allowed time window. There is no code required. Not recommended.
- Static Code: Students enter a session-specific alphanumeric code within an allowed time window.
- Rolling Code: Students enter a rolling code that changes every few seconds while the rolling code screen is shown.
- Static QR Code: Students use their device camera to scan a static QR code within an allowed time window.
- Rolling QR Code: Students use their device camera to scan a rolling QR code while the rolling QR screen is shown.
- Static Code or QR Code: Students enter the static code or use their device camera to scan the static QR code within an allowed time window.
- Rolling Code or QR Code: Students enter the rolling code or use their device camera to scan the static QR code while the rolling code/QR code is shown. This is the recommended option.
The most commonly used code option is the Rolling Code or QR Code. This way, students can choose one or the other if they encounter any issues with their device camera.
Once the desired code option is chosen, click the blue Start Rolling Code/QR button:
The rolling code is displayed. This page can be projected in the classroom.
If you think the size of the alphanumeric code is too small, use the plus/minus buttons to resize, and/or maximize your browser window.
You can also select the number of seconds the present code should remain active until it rotates:
Select the Stop Rolling Code/QR button in the upper right to stop displaying the code.
Canvas Sync & History
If changes are made to the timetable or anywhere else within the aPlus+ application (and also within Canvas, if, for example, grades and assignments are synced with the app), these changes can be synced to ensure everything is up to date:
To view the most recent sync history from Canvas and diagnose any issues with the integration, click the icon highlighted in red below:
Absence Requests
Students now have the ability to request absences for days they will be unable to attend class. As the instructor, you'll need to ensure that you have your sessions appropriately configured on the timetable so that students can request an absence.
Students can request an absence two weeks before a particular session and up until the end of the term.
The quickest way for an instructor to view a student's absence request is to click on either the Students or Reports tab in aPlus+.
Using the Reports tab as an example, you'll see that clicking on it takes you to Attendance Summary by default:
Via the Attendance Summary, you'll see the various statuses resulting from student actions (in the case of absence requests and code-based check-ins) and those you manually assigned to students. Any status beginning with the word "Absent" has been submitted by the student.
To alter a status (e.g. changing it from "unexcused" to "excused"), navigate to the Sessions tab and select a session by clicking on it.
In the example below, the July 5th session is selected:
Now, in the session view for July 5th, you'll find various students and their accompanying statuses. If you click on a status for a student, you'll then see the option to choose a different one:
Once you make the status change selection, scroll back up to the top of the page and click the blue Save button to confirm:
For details on the student absence request workflow, please view our Getting started with aPlus+ in Canvas (Students) article.
Questions?
Troubleshooting tip: If you are using Safari and encounter any access issues, please refer to our Using web browsers with Learning Tools article regarding using Safari with Canvas learning tools. If you have trouble in Chrome, try using a different browser, like Firefox.
Please contact your Wharton Computing representative for support if you need more assistance.